Garage Door Troubleshooting Guide: Symptoms, Causes, and Fixes
If your garage door is acting up, it’s not random — it’s telling you something. This guide breaks down the most common symptoms:
door won’t close
stops mid-way
blinking lights
We’ll go through each one, show you how to diagnose the cause, and give you the exact fix. Then we’ll show you how to avoid most of these issues altogether.
#1 Garage door won’t close or only moves briefly, then light blinks
This is one of the most common garage door issues — and in most cases, it’s related to the safety sensors. When your garage door opener detects a problem with the sensors, it will stop the door and flash the light as a warning.
Here’s how to diagnose it step by step:
Step 1: Check for anything blocking the sensors Cause: Physical obstruction
Garage door sensors work by sending a beam between two points near the floor. If anything breaks that beam, the system assumes something is in the way. Even small objects can trigger this:
tools
storage items
trash bins
kids’ toys
Fix: Remove anything blocking the path between the sensors.
Step 2: Check if the sensors are aligned Cause: Misaligned sensors
The sensors must point directly at each other to work properly. Look at the receiver (RX) sensor:
Solid light → working correctly
Blinking or off → misaligned
Misalignment can happen easily:
bumped by a car
hit by a broom or trash can
loosened over time
Fix:
Gently adjust the sensors until the indicator light is solid
Make sure both sensors are firmly mounted and not tilted
Alternative fix: Replace with a system that doesn’t rely on perfect alignment.
How to Identify the Transmitter and Receiver?
Stand facing the sensors and look for the one with a status light that changes when alignment is off — that’s the receiver (RX). The other sensor, which usually has a constant light or no visible change, is the transmitter (TX).
Step 3: Check for small obstructions Cause: Dust, debris, or spider webs
Sometimes the beam isn’t fully blocked — just weakened.
Common culprits:
dust buildup
paint overspray
spider webs
These can interfere enough to trigger a failure.
Fix: Clean both sensor lenses carefully.
Step 4: Check wiring connections
Cause: Loose or disconnected wire (sensor or opener connection)
If the wiring is loose at either the sensors or the opener, the system won’t function at all.
Check:
wires at each sensor
wire nuts (if present)
connections at the garage door opener
Fix: Reconnect any loose or disconnected wires by the sensors.
Reconnect any loose or disconnected sensor wires at the opener (look for the twisted pair wires).
Step 5: Check if the sensor has failed Cause: Faulty sensor
If:
lights are off
or flickering
and all previous steps didn’t fix it
…the sensor itself may be defective.
Fix:
Replace the faulty sensor
Or upgrade to a more reliable system
#2 Garage door starts closing, then stops at random positions
This usually happens when the safety sensor signal is interrupted inconsistently — not fully blocked, but disturbed enough to confuse the system. One of the most common (and overlooked) causes is sunlight interference.
How to recognize it:
The issue only happens at certain times of day
Usually when the sun is low (morning or evening)
The door stops at different positions each time
Fix options: Option 1: Swap transmitter and receiver sides
If sunlight is hitting the receiver side:
Move the receiver (RX) to the shaded side
Move the transmitter (TX) to the sun-exposed side
⚠️ This only works if sunlight is coming from one direction.
Option 2: Shade the receiver
Create a simple shield to block direct sunlight:
a toilet paper roll
a small tube or cover
This reduces interference and stabilizes the signal.
Option 3: Use a system that isn’t affected by sunlight
Traditional sensors rely on a single beam that can be disrupted by light.
More advanced systems are designed to:
handle bright conditions
maintain consistent detection
avoid false stops
#3 Nothing happens when pressing the wall button, but the opener has power and the remote works
If your remote can close the door but the wall button does nothing, the issue is usually local to the wall control wiring or the button itself. The wall button is connected to the garage door opener with low-voltage wires.If these wires come loose, the button won’t send a signal.
Common issues:
loose terminals
disconnected wires
worn or damaged wire ends
Check:
behind the wall button
wire connections at the opener (GDO).
Step 1: Check for loose or disconnected wires Cause: Loose wall control wiring at the opener
How to Identify the Wall Button and Sensor wires? You can tell which wires are for the sensor. The wires that have two wires twisted together are for the sensor. The wires that have single wires connected to the GDO are the wall button.
Cause: Loose wall control wiring at the button
Fix:
Reconnect any loose or disconnected wires securely.
Loose wires at the wall button may not be visible from the outside. Remove the wall button cover or panel and check that both wire connections inside are secure and firmly attached.
Step 2: Check if the wall button is faulty Cause: Bad wall button
If:
wiring is intact
opener has power
remote works normally
…then the wall button itself may have failed.
Fix: Replace the wall button with a compatible unit.
#4 Nothing happens when pressing the wall button and the opener has no power
If the garage door opener (GDO) shows no signs of life — no lights, no sound — the issue is most likely related to power supply or the opener itself.
Step 1: Check the power source Cause: No AC power
Start with the basics.
Check:
Is the opener plugged in?
Is the outlet working?
Has the breaker tripped?
Power loss can happen due to:
unplugged cord
tripped breaker
faulty outlet
Fix:
Plug the opener back in
Reset the breaker if needed
Test the outlet with another device
Step 2: Check if the opener is receiving power
Cause: Faulty garage door opener (GDO)
If power is confirmed but the opener still shows:
no lights
no response
no sound
…the unit itself may be defective.
Quick test:
Unplug the opener
Plug it back in
Check if any lights turn on
If nothing changes, the opener is likely not functioning.
Fix:
Replace the garage door opener.
#5 Garage door starts closing, then stops or reverses at the same height every time
If your garage door consistently stops at the exact same position, the issue is usually something physically blocking its path — not the sensors.
Step 1: Check for obstructions in the track or door path
Cause: Object blocking the door (not the sensors)
Unlike sensor issues, this type of problem is repeatable. The door stops at the same point because something interferes with its movement every time.
Check:
both side tracks
rollers and hinges
the full path of the door as it closes
Common causes:
debris in the track
small objects lodged in the track
tools, storage items, or equipment near the door path
warped or slightly bent track
Fix:
Remove any object blocking the track or door path.
#6 Garage door closes but doesn’t fully shut. It stops before the floor — and the stopping point is consistent
If your garage door doesn’t close all the way and stops at the same position each time, the issue is usually not sensors or obstructions. This is typically a limit setting issue.
Step 1: Check the close limit settings
Cause: Incorrect limit switch adjustment
Garage door openers use limit settings to determine how far the door should travel when closing.
If these limits are set incorrectly:
the door may stop too early
the stopping point may vary slightly each time
This can happen after:
installation or adjustment
power interruptions
wear over time
Fix: Adjust the close limit
You can see how to set the garage door travel limits in the video above.
Why Basic Garage Sensors Aren’t Enough
Traditional sensors were designed decades ago — and they still rely on one line of detection just a few inches above the ground.
That’s why they miss:
open trunks
roof racks and antennas
trailer hitches
anything above the tire line
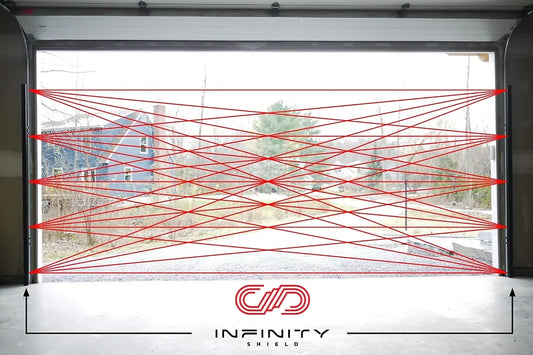
What Full Coverage Looks Like
Instead of relying on a single beam, Infinity Shield use full-door coverage.
That means:
the entire opening is monitored
not just one narrow line
from the floor all the way up
So if anything is in the path — the door won’t close.
Built to Avoid Common Failures
Infinity Shield is designed to eliminate the problems you just diagnosed:
No precise alignment required Works even if components are slightly out of position
Resistant to sunlight interference No random stops when the sun hits the sensor
Detects real-world obstacles Not just objects near the ground
Quick and simple setup Installs in minutes using existing wiring — no special tools or complex adjustments required. Compatible with all major garage door opener brands.
Added Benefit: Guided Parking
Infinity Shield also include audio feedback to help with parking.
As you pull in:
you hear a signal
it changes as you get closer
and stops when you’re in a safe position
So you’re not guessing anymore—you know when you’re clear.
Final Thoughts
Garage door problems are frustrating — but most of them are predictable.
And once you understand the cause, you can either:
fix the issue temporarily
or upgrade to a system that avoids it altogether
If you’re tired of adjusting, cleaning, and troubleshooting the same issues… it may be time to move beyond a single-beam system.
If your garage door is acting up, it’s not random — it’s telling you something. This guide breaks down the most common symptoms: door won’t close stops mid-way blinking lights...
If your garage door is acting up, it’s not random — it’s telling you something. This guide breaks down the most common symptoms: door won’t close stops mid-way blinking lights...
Installing a new garage door or motor gives you an opportunity to rewire for your sensors and only run the wired to the top of your door, rather than running...
Installing a new garage door or motor gives you an opportunity to rewire for your sensors and only run the wired to the top of your door, rather than running...
Why do some people hang a tennis ball in their garage? This is a common trick homeowners have come accustomed to performing to aid them in parking at exact spot...
Why do some people hang a tennis ball in their garage? This is a common trick homeowners have come accustomed to performing to aid them in parking at exact spot...